
CHEESE Advanced Training on HPC for Computational Seismology
https://cheese-coe.eu/events/cheese-advanced-training-hpc-computational-seismology
The Salvus tutorial happens October 21rd from 9:00 to 12:00 Central European Time (CET).
Opening a Jupyter Notebook for the Salvus tutorial
A prepared installation has been set up on the training cluster of the HLRS so the only thing that remains to be done is to launch it and connect it to your local browser.
Your SSH connection should already be set up from all the other tutorials so this should be quick.
Linux/OSX/WSL
Open a shell, copy the following line (replace scaXXXXX with your actual
user name!) and hit enter.
USER=scaXXXXX; ssh -L 33${USER:(-3)}:localhost:33${USER:(-3)} -t ${USER}@training.hlrs.de "bash /shared/cheese/salvus/config/launch_salvus.sh 33${USER:(-3)}"This will take around 30 seconds and at the end it will present you with a
link like https://localhost:XXXXX/?token=.... Open this link in your
browser and you are all set.
Windows
This is a bit more complicated, if possible we’d recommend to use the WSL on Windows and do what is written above.
But PuTTY can also be made to work (most things should already be set up from the previous tutorials):
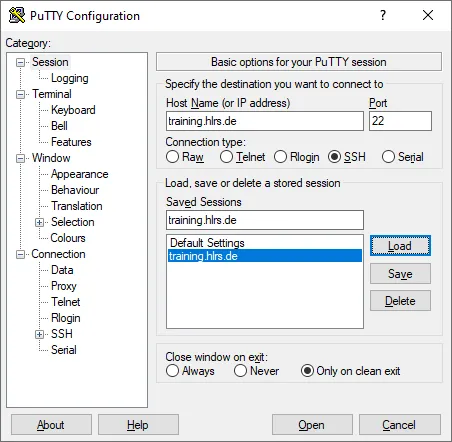
1. Hostname + port
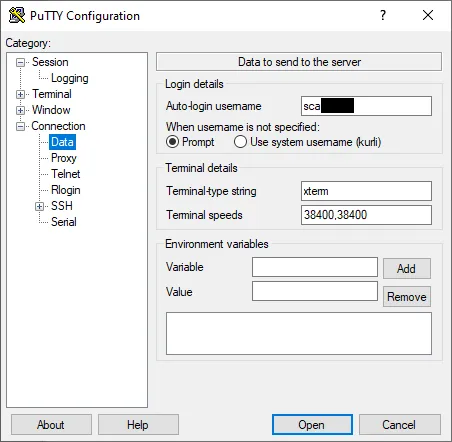
2. Username
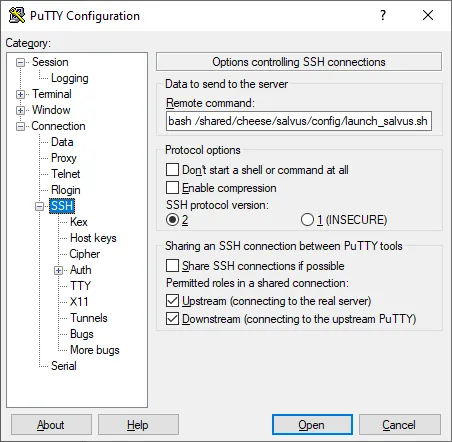
3. Remote command
You can either enter this here (it will then be run automatically upon connecting) or just run it once the remote connection opened:
Replace the 33XXX as written above.
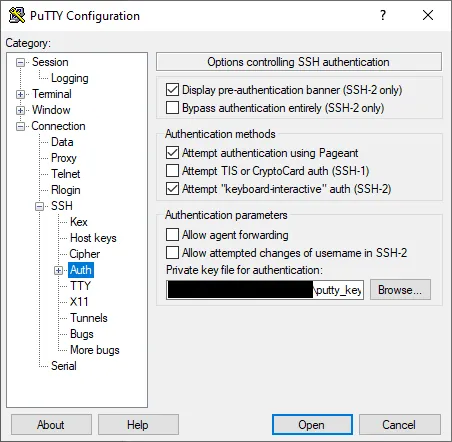
4. Key
This should already be set up from the previous tutorials
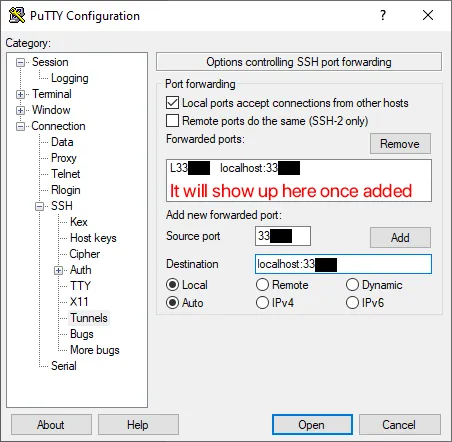
5. Tunnels
Add 33XXX as the source port and localhost:33XXX as the destination and
then press Add.
Replace the 33XXX as written above.
6. Save and Open Connection
Save the session (to not have to re-enter everything if something is wrong) and click “Open”.
This will take around 30 seconds and at the end it will present you with a
link like https://localhost:XXXXX/?token=.... Open this link in your
browser and you are all set.
What is happening here?
It opens an SSH connection and directly executes the launch_salvus.sh
script. Additionally it forwards a local port to the same port number on the
remote machine.
Upon execution the script prepares your environment on the training cluster for Salvus, launches an interactive job for the duration of the tutorial, tunnels the same port from the compute to the login node, and finally launches a jupyter notebook server on that same port.
All the tunneling really only serves the purpose to be able to access the jupyter notebook server from your local browser.
tmux
The script internally runs everything in tmux - thus if your connection drops for some reason, just rerun the script and will detect that tmux runs and only keep the tunnel open. Thus you should be able to reconnect to the jupyter notebook server with your browser.